Minecraft Observatory Generator
Create an Observatory model to build in Minecraft using Plotz, the HTML5 modeller. Plotz can model an observatory up to 128 blocks in diameter. This help page documents all the information you need, then you can launch Plotz Minecraft Observatory generator.
Launch Plotz Minecraft Observatory Generator
Using Plotz to make an Observatory in Minecraft
From the Plotz model menu select the Observatory or use the direct link above. The default model has base, 32 blocks in diameter. There is also an outer ring halfway up so if building in a tight space, allow an extra 2 blocks to include it. Plotz modeller uses the full with and height of your web browser so resize your window or enter full screen mode to make this most of this. Plotz will re-orienate to portrait or landscape mode on some mobile devices.

Alter the size of your observatory model using the slider along the bottom of the display. This controls the diameter of the base wall from which the height is calculated for you. The height can be seen on the vertical layer slider on the right.
You can hide the size slider using the << button. Select the size value to show it again.
Return to the model menu at any time by going back in your browser OR selecting the model name button at the top.
The number shown in the top right is how many blocks you'll need to build the observatory in Minecraft.

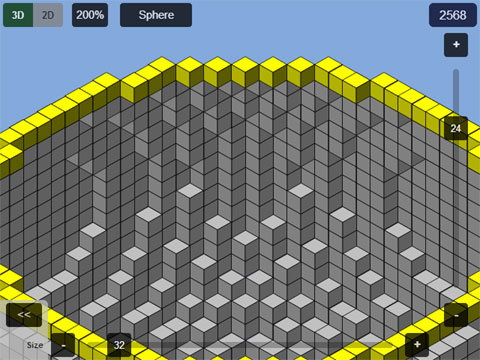
Use the layer slider on the right hand side of the display to show up to a specified horizontal layer of the model. This layer will be highlighted yellow in 3D mode.
Building is obviously done best from the bottom up, so drag the layer slider to the bottom layer 1. Build that layer in Minecraft and use the + button above the layer slider to advance to the next layer, continuing to build vertically.
Dragging the layer slider to the top will leave that layer highlighted yellow. If required, use the + button to hide the highlight.

Zoom works in both 2D and 3D modes and cycles through values of 100%, 200% and 400%. When zoomed drag the main canvas to pan around the model display. Plotz will only update the display when you stop dragging. This saves graphics memory and prevents render failures on lower end devices.
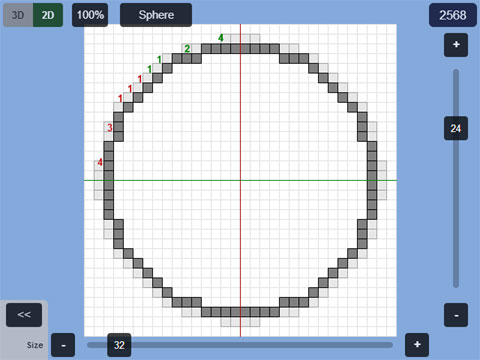
Zoom is particularly useful in 2D mode as almost all models have symmetry meaning you can zoom in to the left quadrant and build it 4 times to make the whole layer.

Switch between 2D and 3D mode using the top left buttons. While the 3D display gives a good idea of how a model will look when built, 2D mode is arguably more useful for construction, especially for larger models.
In 2D mode each layer of your model is displayed as a 2D grid. Blocks on this layer are clearly displayed. Any blocks visible on the layer below appear ghosted out helping you position the current layer.
2D mode includes block counts in coloured groups of 5 (5 red, 5 green, 5 blue etc.) helping build curves. Remembering a squence of 5 block lengths, building them and repeating with the next sequence can be a very efficient way of constructing. These counts are only shown in the top left quadrant. Symmetry means most models simply require this quadrant to be built 4 times over.
